Previous article: Introducing Project Templates for Razor Pages
In the previous article, I introduced what the Cotomy Razor Pages templates are for and how Standard and Professional are positioned. This time, I want to focus on something more practical: what you actually receive after purchase, how that package is structured, and what the correct start path looks like.
This template is not just a sample application bundled into an archive. It is a structured base for building business applications on Cotomy and Razor Pages, and the structure of the package is part of that design. The package is distributed as a ZIP file, the contents differ slightly by plan, and the correct way to begin is defined by the package itself. The template reference page is here:
https://cotomy.net/razorpages/
The ZIP file is a distribution package, not your working solution
After purchase, you download the archive that matches your edition, such as cotomy-razorpages-project-template-standard.zip or cotomy-razorpages-project-template-professional.zip, and extract it. What appears after extraction is the distribution package. That distinction matters because the extracted root is not yet the application workspace you will continue developing in.
The first thing to understand is that this root folder is a handoff package. It contains the material used to create or study a solution, but it is not itself the final working solution that should become your real project. The package includes the solution templates, the scaffolding templates, the reference source, and the documentation that defines how to proceed.
That is why the first action should always be to open the root README.md. The README is not supplementary reading. It defines the actual setup order.
What is in the extracted package
At the root level, the package contains the pieces needed to understand the product and start from the intended path. In practice, the important directories are docs, source, and templates, together with the root README and the edition-specific template package file.
The package structure is built around four roles. The README defines the setup order. The solution template package is what enables solution generation through dotnet new. The templates folder contains the smaller scaffolding templates used later for adding segments and pages. The source folder contains reference workspaces that show what the generated structure looks like in a concrete form. The docs folder explains how to use what was generated.
That is also why copying folders from source is not the recommended first step. The product itself is centered on the project templates, and the source area is attached as supplementary material so you can inspect or refer to a concrete workspace when needed. The intended route is still README first, then template registration, then solution generation.
Standard and Professional are different in structure, not only in feature count
The easiest way to understand the two editions is not by reading them as a simple feature checklist. The more useful view is structural.
Standard edition
Standard is the lighter package. It focuses on the UI runtime, page structure, and the integration points that let you connect your own backend decisions.
In the bundled material, Standard gives you Core as the shared foundation, UISample as the UI reference, AuthSample as the minimum authentication reference, the templates folder, the source folder, and the documentation set. In the generated starter workspace, the minimum structure is the main host project plus Core. In the generated sample workspace, the main host project is joined by Core, UISample, and AuthSample.
What Standard does not include is equally important. It does not include a persistence layer, it does not include the Professional EF Core data setup, and it does not give you a packaged full-stack application baseline. If your system already has backend decisions or if persistence should remain your own responsibility, that is exactly why Standard exists.
Professional edition
Professional starts from the same base and adds the missing full-stack pieces. The additional structural units are DataModel, Auth, and EFCRUDSample.
That changes the package from a UI and integration baseline into a full-stack starting point. In the Professional starter workspace, the minimum structure already includes the main host project, Core, DataModel, and Auth. In the Professional sample workspace, UISample and EFCRUDSample are added so that you can inspect the full connection from UI to persistence.
The practical difference is simple. Standard is frontend plus integration boundary. Professional is a full-stack base that already includes the persistence and authentication side needed to begin from a more complete business application skeleton.
README is the real entry point
The most important rule in the package is straightforward: do not improvise the setup order. The root README defines the real path, and skipping it causes failures immediately.
This is not theoretical. The package documentation explicitly warns that reordering the initial steps leads to startup and environment failures. If you run the application before setting the signing key, startup fails. If you skip the frontend build path embedded in the workspace instructions, the UI is not in a valid runnable state. In Professional, if SQL Server is not running and healthy before the migration and run path, the database steps fail immediately.
This article therefore should not be used as a replacement for README. Its purpose is narrower. It explains why the package is structured the way it is and why the flow is extract, read, register templates, generate a solution, and then continue from the generated workspace README.
What to install before you start
One thing worth checking before you even run the template commands is whether the base tools are already available on your machine. The bundled documentation under docs assumes this order as well, and it is better to confirm the environment early than to discover it halfway through setup.
For both editions, the minimum starting point is .NET SDK 10.x together with Node.js LTS and npm. In the Professional README, the packaged setup path is written around SQL Server and EF Core migrations, so Docker and the dotnet ef tool are also part of that baseline entry route. That said, this should be read as the documented default path for the bundled setup, not as a claim that EF Core can only be used with that database choice. If you intend to run Professional against a different database, read those environment steps in terms of your actual provider and runtime setup rather than copying the SQL Server path literally. VS Code is also the recommended editor in the documentation, not because it is mandatory, but because the generated workspaces already include tasks and guidance that fit that editor well.
The safest recommendation here is still the ordinary one. If .NET is not installed yet, use the official installer from Microsoft. If Node.js and npm are not installed yet, use the standard LTS installer from nodejs.org. If you are following the default Professional path documented in the package, install Docker Desktop by the usual installer route and add dotnet ef with the standard global tool command shown in the README. If your Professional environment uses a different database path, replace those infrastructure-specific steps with the equivalent setup for that database before continuing. That is enough for an entry point. It is better to follow the package README for the actual verification and edition-specific steps than to over-specify OS-by-OS installation detail in this article.
In other words, this article should tell you what to have ready, but the package documentation should remain the source of truth for the exact setup sequence.
Install the templates before creating a solution
The package supports two kinds of template installation. First, install the solution template package that matches your edition. Second, install the shared scaffolding templates from the templates folder.
Install only the package that matches your edition.
# Standard
dotnet new install ./Cotomy.Templates.Standard.nupkg

# Professional
dotnet new install ./Cotomy.Templates.Professional.nupkg

# Shared templates
dotnet new install ./templates
In actual use, you install the edition package that matches the archive you purchased, not both editions at once. The shared templates folder enables the smaller generators used after solution creation.
Once installed, the available commands fall into two different groups, and it is better not to mix them conceptually.
The first group is for creating the solution itself.
dotnet new cotomy-standard-starter -n <SolutionName> -o <SolutionName>
dotnet new cotomy-professional-starter -n <SolutionName> -o <SolutionName>
dotnet new cotomy-standard-sample -n <SolutionName> -o <SolutionName>
dotnet new cotomy-professional-sample -n <SolutionName> -o <SolutionName>
In these examples, SolutionName means the name you want to give your generated solution and main project folder. These are the commands that generate the initial workspace. They decide the solution shape, the main project name, the root layout, and the edition boundary from the start. The starter commands create the minimum working base. The sample commands create the runnable reference workspaces.
These two groups serve completely different purposes and should not be confused.
The second group is for extending a solution that already exists.
These are not alternative ways to start a project. They are follow-up templates used after the starter solution has already been created.
For this package, I prepared dotnet new templates not only for creating the solution itself but also for adding a segmented project structure and a full page set that already includes the TypeScript entry point.
The word SegmentName matters here. In .NET, the application can be split into multiple projects, and this template set assumes feature-level separation through Razor Class Libraries. At the same time, if Pages paths with the same names are repeated across projects, routing becomes harder to keep clear. That is why the templates intentionally put pages under a segment-shaped path and keep that segment name visible in the generated structure.
cotomy-rcl
dotnet new cotomy-rcl -n <SegmentName>
SegmentName means the target project or business area, such as Sales.
cotomy-rcl creates a new segment as a Razor Class Library. In practical terms, that means a new business area such as Sales or Inventory gets its own project, its own Pages tree, and its own Cotomy-compatible view imports. That separation is important because the segment is not just a folder. It is a project boundary that keeps one screen area grouped as a reusable unit inside the solution.

This screenshot shows that cotomy-rcl appears in the IDE UI after installation. Even so, this package expects you to run it from the command line in the workspace root. Here the UI path is basically just an error path, so do not use it from that screen.
cotomy-page
dotnet new cotomy-page -n <PageName> -P <SegmentName>
dotnet new cotomy-page -n <PageName> -P <SegmentName> -D <SubDirectory>

# example
dotnet new cotomy-page -n CustomerEdit -P Sales -D Admin/Master
PageName means the page you want to add. SegmentName means the target segment project, such as Sales. SubDirectory means an optional nested folder under Pages within that project.
The target segment must already exist, typically created with cotomy-rcl, before using cotomy-page.
cotomy-page works inside a segment that already exists. It generates the page as a co-located unit of Razor, PageModel, scoped CSS, and TypeScript controller entry point under the segment’s Pages path. That matters because a Cotomy page is not only markup. The intended structure is one page name tied to its server logic, page-scoped styling, and client-side controller behavior from the beginning.
The P option is the segment project folder name, and at the same time it is the segment folder name used under Pages. The D option adds an optional nested directory under Pages/SegmentName/, so the generated page lands in a shape such as Pages/Sales/Admin/Master/CustomerEdit.cshtml.
In practice, leaving that structure as generated is usually the safest choice. One practical reason is that keeping the project name in the page path helps avoid confusion when the same cshtml name exists in more than one project. If that structure still bothers you, the realistic alternatives are to move only the main project pages to a different organization of your own, or to stop using the template for that page and create the cshtml set manually.
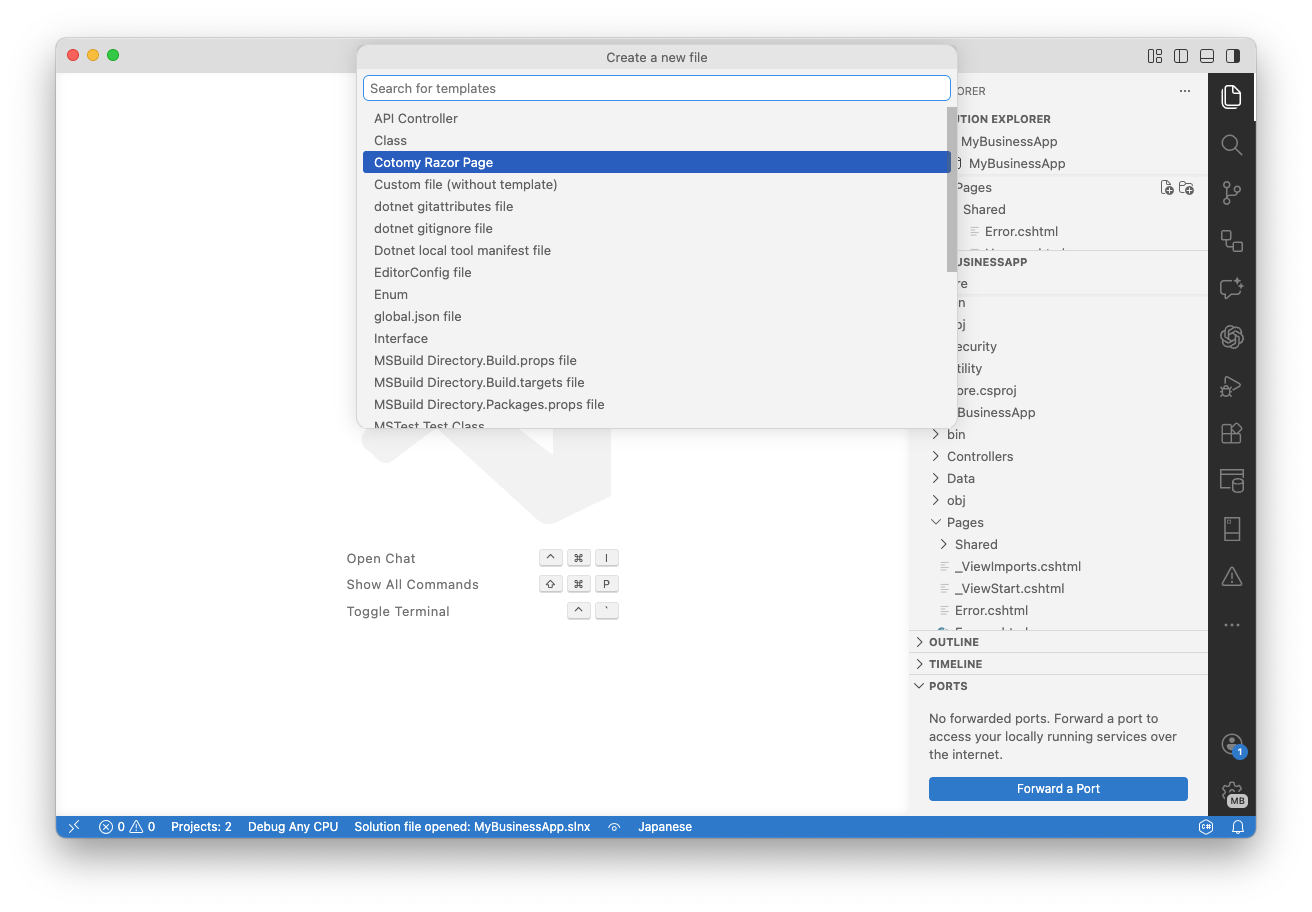
This screenshot shows that solution templates also appear in the IDE UI. They are visible there, but they must not be used for solution creation in this package. The same warning applies to cotomy-page as well: after installation, these templates will appear in the IDE template UI, but they are designed to be used from the command line. If you try to use that UI flow here, you are again stepping into the error path rather than the supported path.
This is the recommended route because it keeps naming, solution shape, and project structure aligned with the package design. Starting by copying the source folder bypasses that initialization path and loses the main advantage of using a project template in the first place.
Create a solution through dotnet new
After template installation, the next step is solution generation. This is where the package stops being a distribution and starts becoming your own workspace.
There are two different generated solution types. Starter is the minimum real project base. Sample is the reference implementation used to inspect how the pieces are meant to fit together. Starter is for beginning your own application. Sample is for understanding and verifying the included structure.
Using dotnet new here is important for reasons that are easy to miss if you only look at the generated files afterward. The template binds the solution name, the main project name, the workspace layout, and other generated paths together from the same input. That avoids the manual rename drift that usually appears when people start from a copied reference workspace and then retrofit their own application identity afterward.
Run the following command in an empty working directory, not inside the extracted package.
For example, to create a new Standard solution from the terminal:
dotnet new cotomy-standard-starter -n MyBusinessApp
cd MyBusinessApp
code .
This creates a new solution with your chosen name and opens the generated workspace in VS Code. For Professional, replace the template name with cotomy-professional-starter and continue with the Professional README steps for the environment side.
Important: do not use the Visual Studio or VS Code template UI
When you install the templates, Cotomy Standard, Professional, RCL, and page-related templates can appear in the Visual Studio or VS Code template selection UI. That visibility is expected because the IDE is only reflecting what was installed.
The important point is that this UI must not be used for this package flow, whether you are creating the solution or trying to add an RCL segment or page from those screens.
If you use the UI, the workflow fails in two different ways. For solution creation, the solution structure can break. In particular, the IDE flow can generate an additional solution file at an unintended location, which produces duplicated solution roots and a directory layout that no longer matches the package design. For cotomy-rcl and cotomy-page, the issue is simpler: in this package flow, using the IDE UI is basically just an error path instead of the supported command-line path from the workspace root.
This is a structural failure, not a cosmetic one. Once the IDE flow creates that extra solution in the wrong place, the relationship between the solution root, the main project folder, and later segment generation breaks. The workspace no longer matches the assumptions built into the template. That is the failure pattern shown in the screenshots above: the templates are visible in the UI, but using the UI for solution creation leads to the wrong shape.
Because of this, the rule is strict. Always create the solution by running dotnet new from the terminal. Do not use the Visual Studio or VS Code template selection UI for solution creation in this package.
In shorter form: if you use the UI, the solution structure can break. Use dotnet new only.
The source folder is attached for reference, not as the recommended start path
The source folder is included intentionally, but it is not the center of the product. The main product is the project template itself. The source area is attached so that you have a concrete workspace you can open immediately and use as reference material when you want to inspect the packaged structure directly.
If you start from the source folder, you bypass the template initialization process. That means the solution name is already fixed, the project structure is not aligned with your own application identity, and future extensions through the templates may not match as cleanly as they do in a correctly generated workspace.
Because of that, the source folder should be treated as reference material only, not as the starting point for actual development. The cleaner route remains template installation followed by solution generation with your own project name.
After generation, switch to the generated README
Once dotnet new has created your solution, the setup instructions move with it. Every generated workspace contains its own README, and that README becomes the operational guide for the next stage.
That is where you follow the concrete environment steps for your generated workspace, including authentication key configuration, build preparation, and run order. In Professional, it is also where the SQL Server and migration path matters. This article stops before those details on purpose because repeating them here would only duplicate instructions that already belong to the generated workspace.
Docs are part of the product, not optional extras
The docs folder should be treated as part of the template itself, not as something you open only when you are stuck. README gives you the entry order, but docs give you the usage map once you are inside the template ecosystem.
Samples.md is the place to read when you want to understand what the included sample projects are meant to teach. TemplateUsage.md is the practical guide for adding segments and pages through the bundled generators. UnitTest.md defines the testing direction. The core-classes folder is the local reference area for the main Cotomy-side classes used from the template.
There is also an important division of responsibility between docs and cotomy.net. The docs folder explains how to use this template package and how its generated structure is meant to be extended. cotomy.net is the broader reference for how Cotomy itself behaves at runtime. One explains template usage. The other explains the runtime library and its design.
Without the docs, you can run the template, but you cannot fully understand or extend it correctly.
The template is designed with the assumption that these docs are read alongside actual development, not only when problems occur.
Correct flow
The correct path is short and strict.
- Extract the ZIP package.
- Open the root README.
- Install the templates.
- Create your solution with dotnet new.
- Move to the generated workspace README.
- Use docs when you need template-specific guidance.
If you keep that order, the package makes sense quickly. If you skip it, the structure looks larger and more confusing than it really is.
Next article: Building the Runtime Environment for the Standard Edition